Why Zombie Nails?
Forget basic glitter and French tips—the latest wave of nail art is dripping with decay, stitched with style, and glowing with gore. Zombie nails are taking over Pinterest boards and Instagram Reels, blending horror fan passion with serious nail artistry. It’s more than just a Halloween trend; it’s a way to wear your love for the apocalypse on your fingertips, combining creepy aesthetics with stunning technique.
Whether you’re a nail art newbie or a seasoned pro, this guide will walk you through 15 viral zombie nail designs, complete with the essential “Survival Kit” to make your undead manicure last—without costing you a real nail.
Part 1: The 15 Designs — A Complete Outline
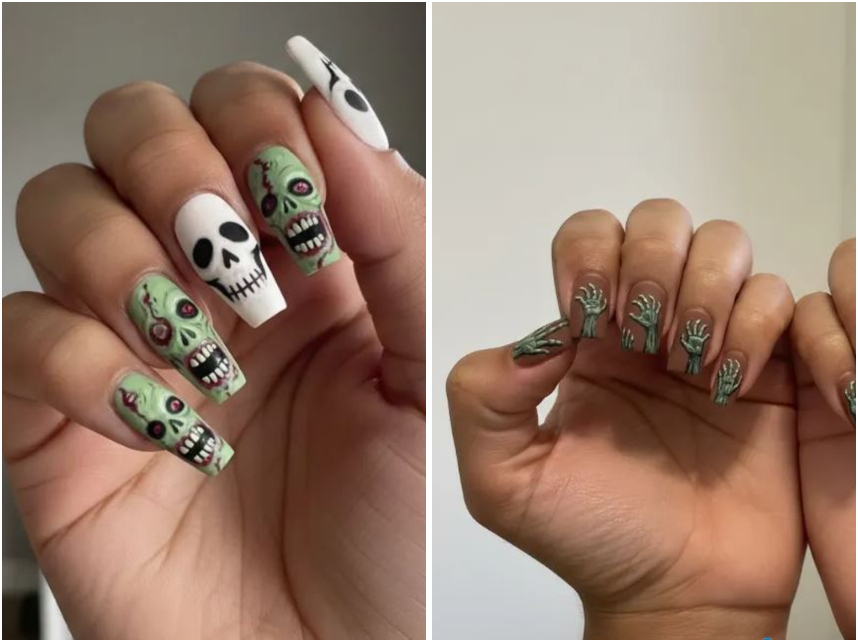
1. Classic Green Zombie Face Nails
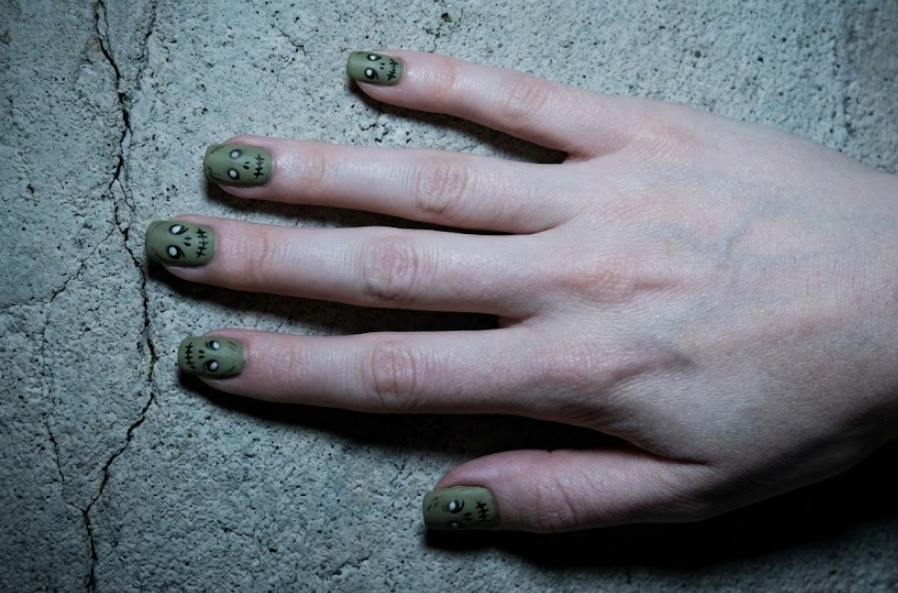
This design features iconic, cartoonish zombie faces. Start with two coats of matte olive green polish and let it dry completely. Using a thin detail brush, paint two large hollow black ovals for eyes. Draw a stitched smile with a black dashed line and small vertical stitch marks. Add a few random black “X” stitches on the forehead or cheek. Seal with a matte top coat for a chalky, undead finish. For hollow eyes, add a tiny white dot in each oval to mimic a dead light glint.
If playful yet eerie styles excite you, these 20 plum-and-orchid nail designs will complete your Halloween look — check them out now!
2. Zombie Brain Nails
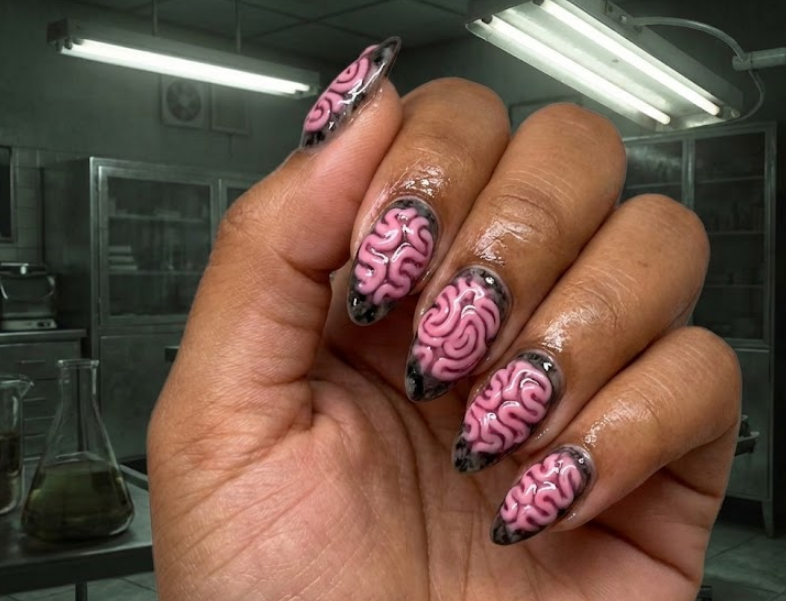
This look showcases exposed, swirly brain matter. Apply a deep black or nude cream base for contrast. With pink polish, paint wavy, concentric squiggles to form brain lobes. Outline one side with darker pink or light red for depth. A glossy top coat gives a wet, freshly exposed effect. Start the swirls from the nail’s center to create a realistic cross-section.
3. Cute Cartoon Zombie Nails
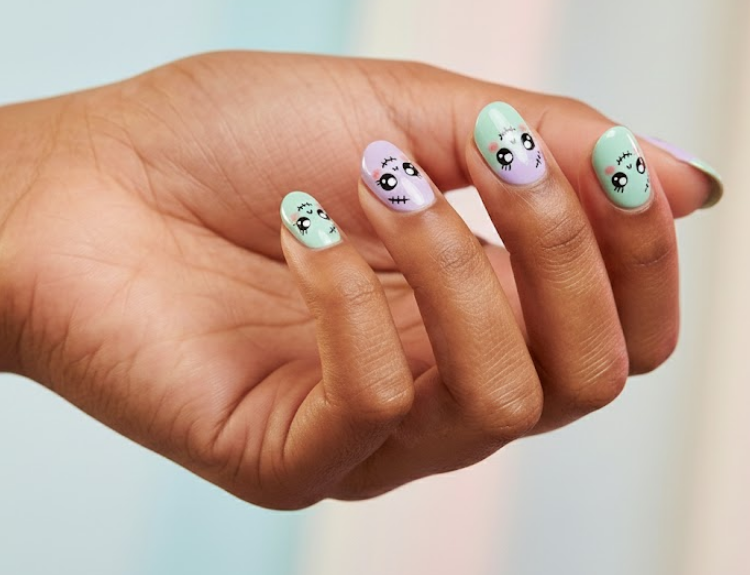
Blend Kawaii style with the undead for adorably creepy nails. Use soft pastels like mint green or lavender as your base. With a dotting tool and detail brush, create chibi faces: big round eyes with one pupil missing, a tiny stitched mouth, and rosy blush. Add small accents like a drawn band-aid. Finish with a high-gloss top coat. Nail art stickers can help if freehand is challenging.
If you love standing out with edgy details, these 15 spooky character nail styles will instantly grab attention — explore them now!
4. Bloody Drip Zombie Nails
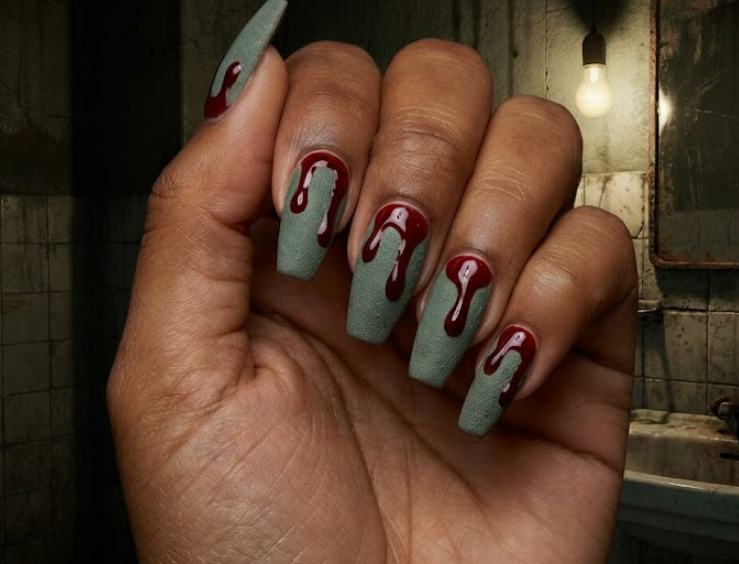
Create fresh blood dripping over rotting skin. Apply a matte grey-green or cadaver nude base and let it dry fully. Using glossy deep red polish, drag from the cuticle down in uneven, teardrop-shaped drips. Touch the top of each drip with darker burgundy while wet for shadow. Use a glossy top coat over the drips for a wet, visceral look. A toothpick can help shape perfect drips before they dry.
5. 3D Zombie Flesh Nails
Achieve hyper-realistic raised open wounds. Start with a light pink or beige gel base cured under a UV/LED lamp. Use 3D builder gel to sculpt torn skin edges around the nail. Fill the “wound” with red, pink, and brown gel for raw flesh. Add thin brown veins leading outward and cure. A matte top coat mimics real skin texture. Texture the wet gel with a toothpick for uneven flesh before curing.
If creepy yet stylish nails are your vibe, these 15 mossy and neon-green manicure looks are waiting for you — click to explore!
6. Stitched Zombie Doll Nails
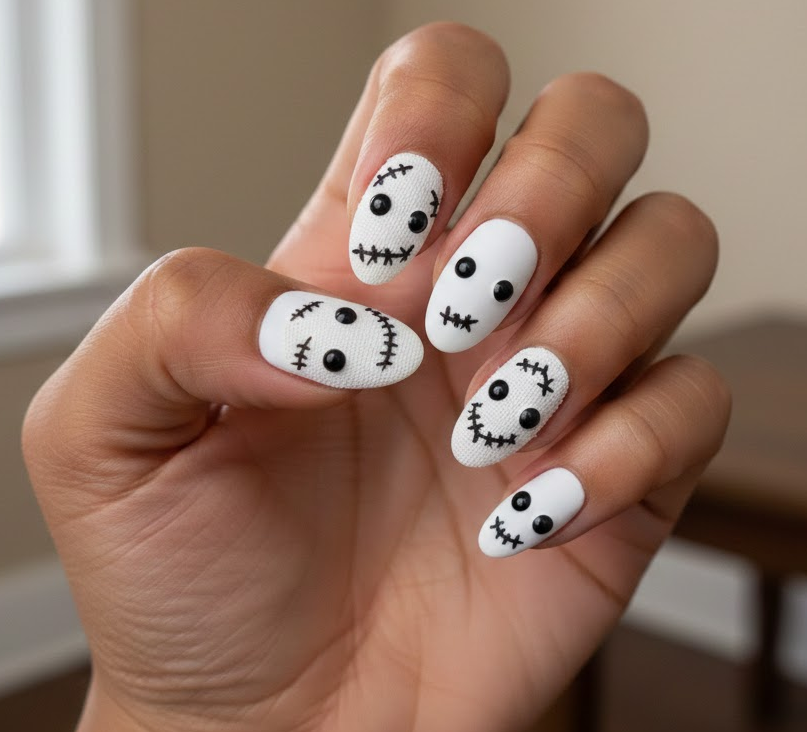
Give a porcelain doll a creepy undead twist. Use matte porcelain white or pale grey as your base. Paint two perfect black circles for button eyes, adding a small white highlight dot. Draw a dashed mouth line with vertical stitch marks. Place random “X” stitches at nail corners. Keep the finish matte for a fabric-like texture. Use a dotting tool for perfect button eyes.
If dramatic contrast excites you, these 20 plum-and-ink Halloween nail styles will steal the show — check them out now!
7. Zombie Eyeball Nails
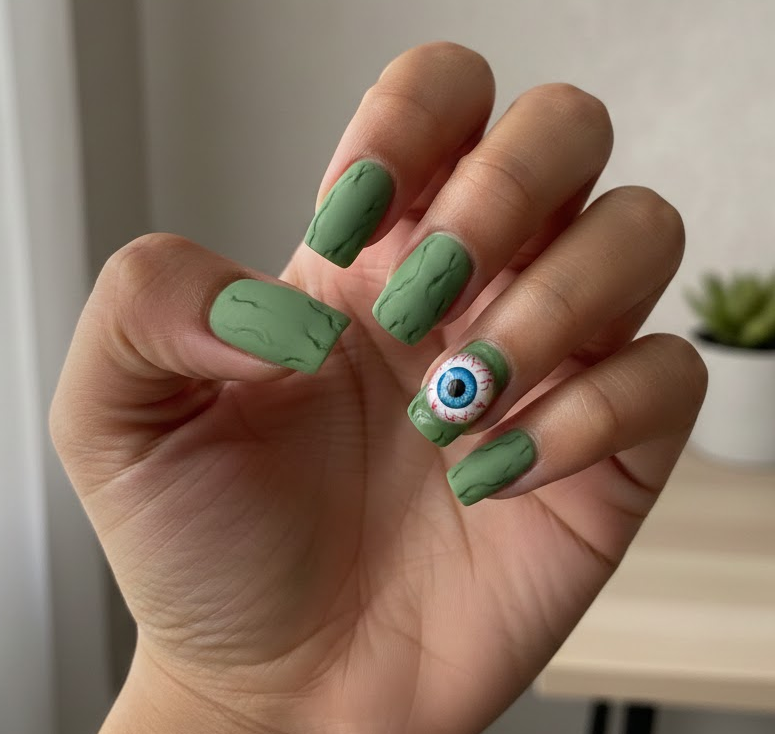
Feature one realistic eyeball accent nail. Paint most nails slime green or with blood splatter. On your accent nail, use a solid white base. With a red striper, paint thin squiggly veins radiating out. Add a colored iris and black pupil in the center. Apply a thick glossy top coat only on the eyeball nail for a wet, alive look. Study bloodshot eye references for uneven vein clustering.
8. Glow-in-the-Dark Zombie Nails
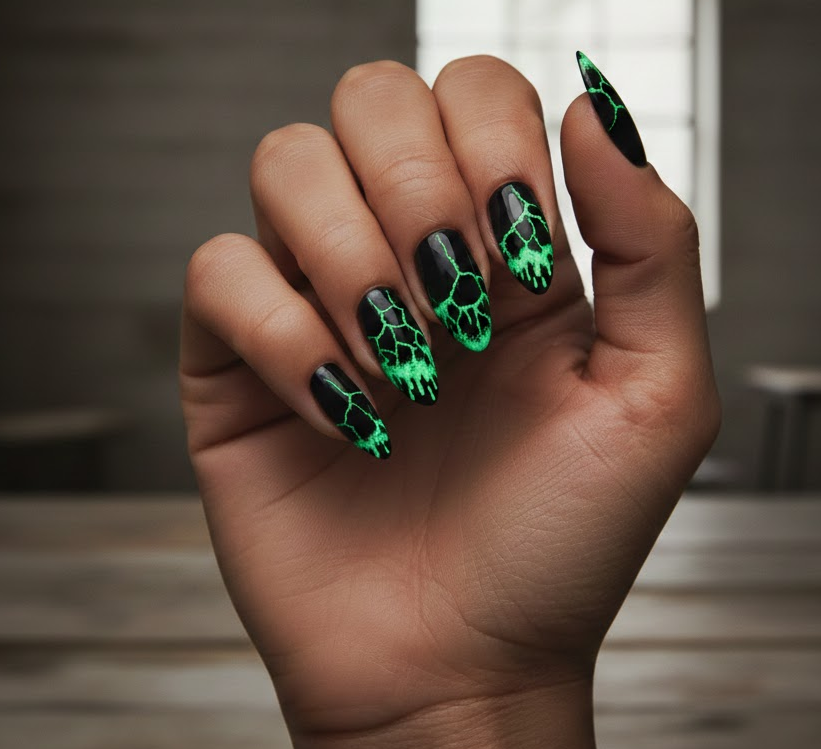
Add a hidden surprise that glows in the dark. Start with a black or deep purple cream base. Using glow-in-the-dark green polish, paint cracked lines, slime drips, or veined webs. Apply two to three layers for maximum glow. Seal with a clear top coat. Charge nails under a bright light for 30 seconds before entering darkness.
9. Half Skull Half Zombie Nails
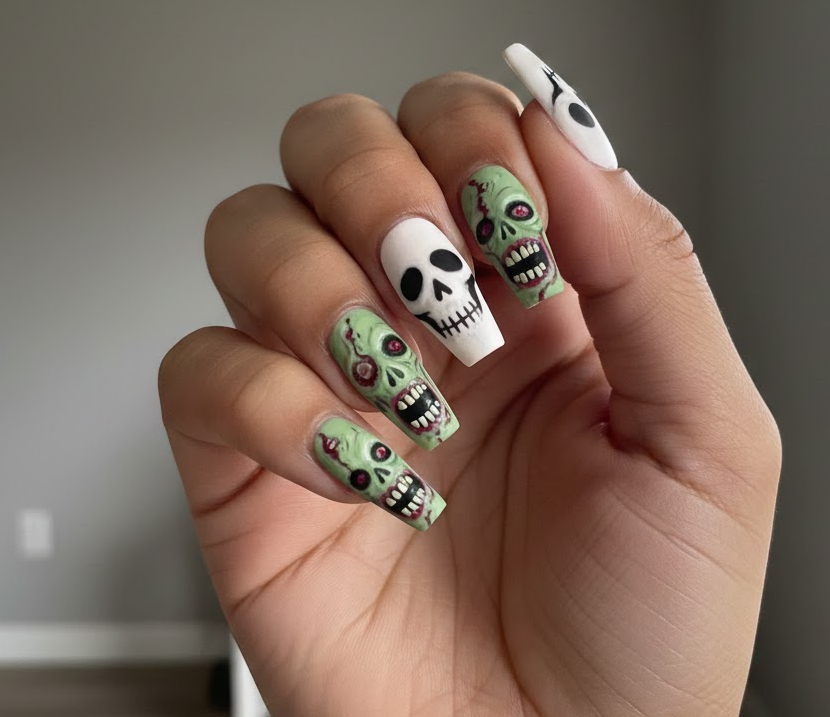
Show a transformation with a split design. Imagine a vertical line dividing the nail. On one side, paint a white skull with black eyes and subtle grey shading. On the other, paint peeling greenish-grey skin with red and black rot. Blend the midline slightly with a damp sponge. A matte top coat unifies the textures. Use tape as a guide for a clean dividing line.
If chaotic color combos thrill you, these 15 joker-inspired purple, green, and black nail designs are made for fearless souls — dive in now!
10. Minimal Zombie Stitch Nails
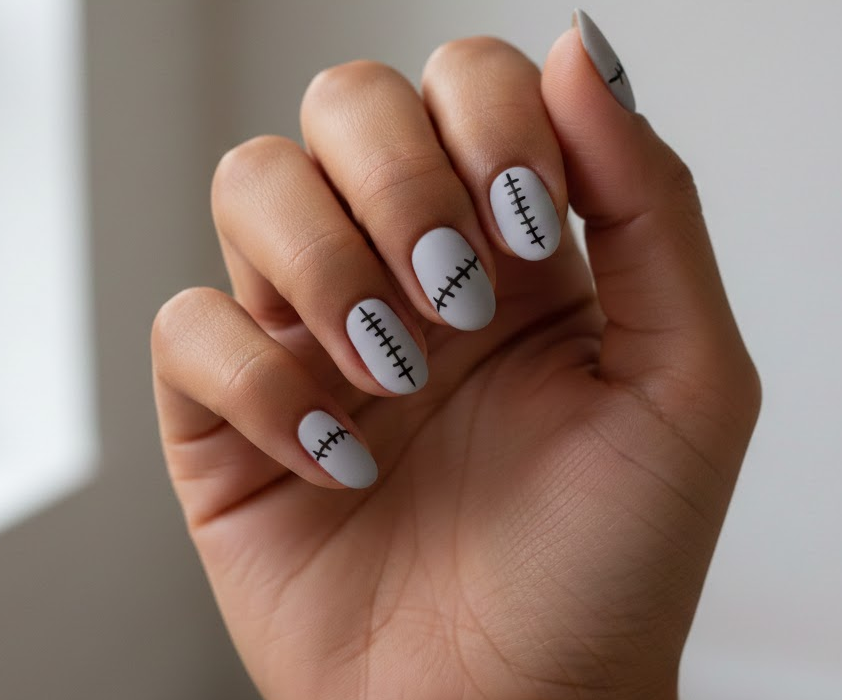
Opt for understated, chic horror. Apply a matte neutral base like light grey or mauve. With a black nail art pen, draw a single dashed stitch line along the cuticle, side, or diagonally. Add small vertical stitch marks over the dash. Finish with a matte top coat. This clean design suits short nails or workplace-appropriate creepiness.
11. Zombie Hand Scene Nails
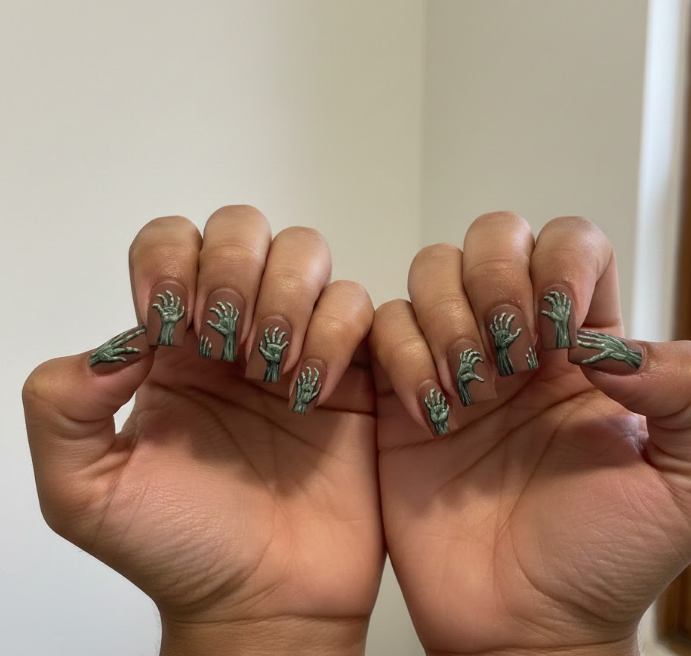
Create a panoramic scene across both hands. Paint all nails a dark brown or grey “dirt” base. On the middle and ring fingers of both hands, paint a pale grey-green rotting hand with broken black nails reaching up from the cuticle. Align the design so hands connect when placed together. Use a matte top coat. Sketch the full hand on paper first to plan placement.
12. Rotten Teeth Zombie Nails
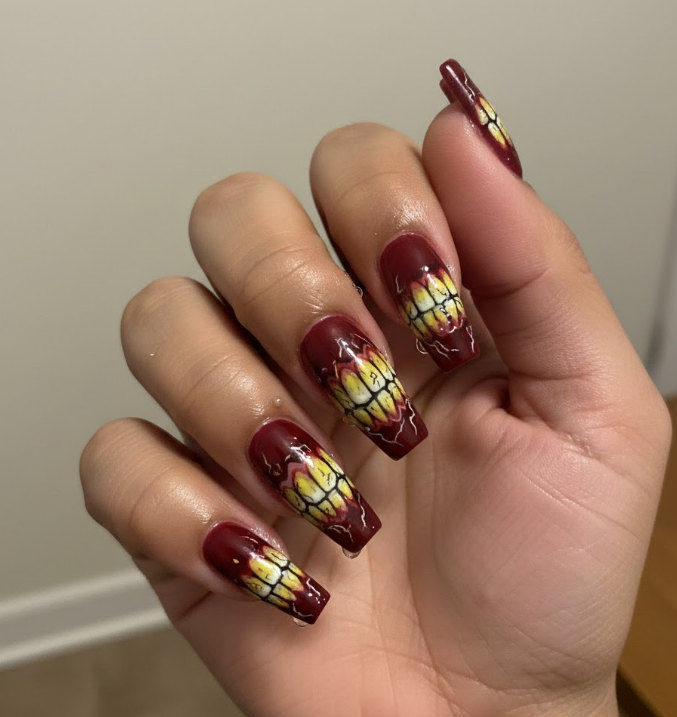
Display a gritty graphic teeth pattern. Use a deep red or black base. With yellowish-beige polish, paint uneven, crooked rectangles as teeth. While wet, drag brown or black polish through some teeth for cracks and decay. Shade between teeth with dark polish. A glossy top coat adds a slimy saliva effect. Vary tooth size and spacing for an unsettling look.
13. Grunge Dirty Zombie Nails
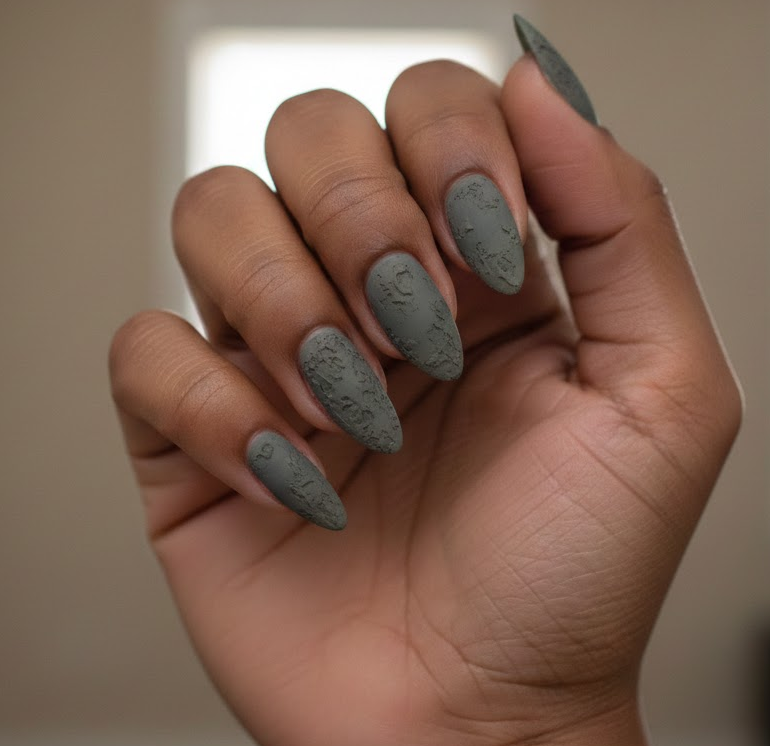
Mimic the look of digging out of a grave. Start with a murky grey-green base. Dab a makeup sponge lightly into brown, black, and dark green polish, then pounce onto nails for a muddy texture. Let each layer dry slightly. Add fine black crack lines with a thin brush. A matte top coat locks in the dry, grungy feel. Build up the dirt slowly in thin layers.
14. Brain French Tip Nails
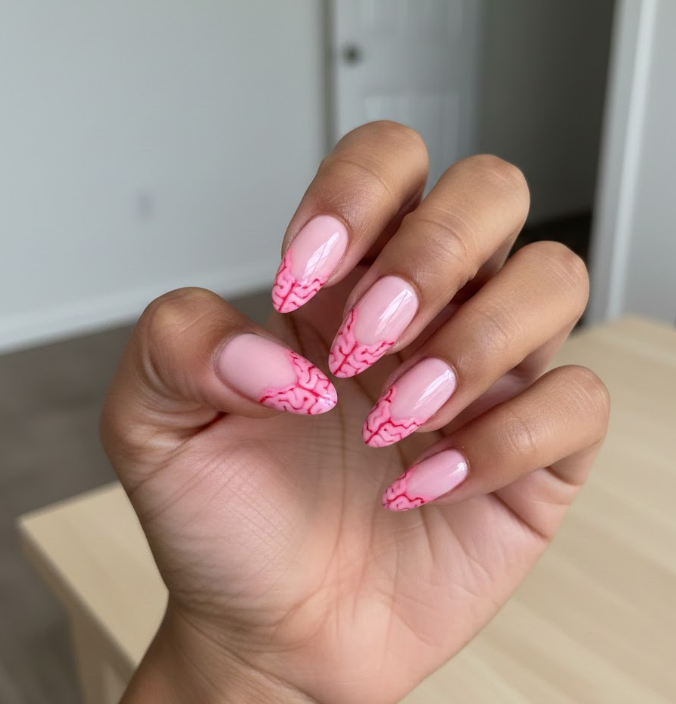
Put a twisted spin on the French manicure. Apply a nude or pale pink cream base. Instead of a straight tip, paint the ends with wavy pink brain-like squiggles. Outline with darker pink and add tiny red blood speckles. Finish with a glossy top coat. Use a curved nail guide or tape to define the brain tip shape before detailing.
15. Chain & Metal Zombie Nails
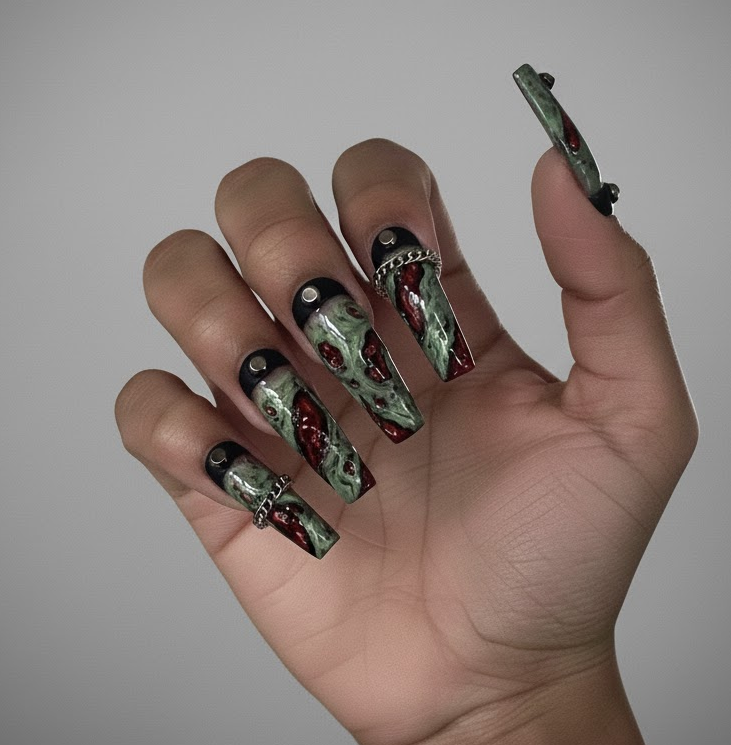
Embrace industrial post-apocalyptic armor. Create a gory flesh wound base blending reds, pinks, and black. Let it become tacky, then attach tiny faux chains, studs, or barbed wire charms with nail art glue. Arrange diagonally or along the cuticle. Seal with a thick glossy top coat over and around the metal to secure it. Never use superglue—only nail-safe adhesives.
Part 2: The Zombie Nail Survival Kit – Essential Prep, Safety & Pro Tips
Executing these designs requires the right tools and knowledge. Think of this as your pre-apocalypse preparedness guide.
A. MUST-HAVE TOOLS & PRODUCTS
- Base & Top Coats: A sticky base coat and quality top coats (glossy & matte) are non-negotiable.
- Brushes: A fine liner brush (#00), a small flat brush, and a dotting tool.
- Special Effects: 3D Builder Gel (for wounds), Nail Art Glue (for charms), Glow Polish.
- Clean-Up: An angled brush dipped in pure acetone for perfect edges.
B. PRE-APPLICATION: PREP THE “BODY”
- Sanitize & Shape: Clean nails with alcohol, push back cuticles, file to a short/medium length.
- Apply Base Coat: A thin layer protects your natural nail from stains and helps polish adhere.
C. APPLICATION & DURABILITY TIPS
- Work in Thin Layers: Thick polish never dries properly and will smudge.
- Seal 3D & Charms Thoroughly: Cap every edge with top coat to prevent snagging and lifting.
- Mix Your Textures: Use matte for skin/rot and glossy for blood/slime on the same nail for ultra-realism.
D. SAFE REMOVAL & NAIL HEALTH
⚠️ CRITICAL: Do not peel off your design!
- The Foil Method: Soak cotton in acetone, place on nail, wrap in foil for 10-12 minutes. Gently slide off softened product.
- Nourish After: Wash hands, apply cuticle oil and a nail strengthener.
- Take Breaks: Give your nails a week of breathing time between complex sets.
E. TROUBLESHOOTING COMMON “OUTBREAKS”
- Smudging? You’re not letting layers dry. Use quick-dry drops or a quick-dry top coat.
- Drips Look Flat? Use two shades of red for depth. Apply the darker shade at the top (cuticle) of the drip.
- Charms Falling Off? You must both glue and seal them with top coat. Ensure the nail surface is clean and dry before gluing.
Conclusion: Unleash Your Inner Nail Artist of the Dead
Zombie nail art is the perfect playground for creativity, mixing horror, fashion, and technical skill. With these 15 designs and your new “Survival Kit” knowledge, you’re ready to create stunning, conversation-starting manicures that are truly to die for.
So gather your polishes, steady your hand, and remember—in the world of nail art, it’s okay to let your creativity rot a little. Happy creating!