Finding press-on nails that actually fit can feel like a treasure hunt. Too big, and they catch on everything. Too small, and they pop off before you finish your coffee. Forget the frustration! Here’s my tried-and-true guide, gathered from countless sets and trial-and-error, to measure your nails perfectly using simple things you likely have at home.
9 Easy Techniques to Measure Your Nails Accurately
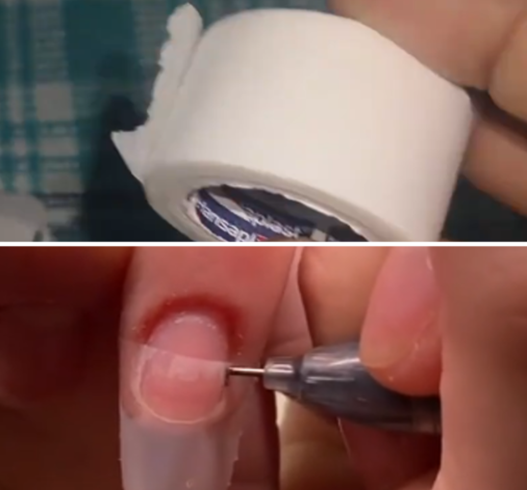
1. The Classic Tape Trick (My Go-To!):
Grab some clear tape (scotch tape works great).
Press a piece firmly over the widest part of your natural nail, from one sidewall to the other. Make sure it’s smooth.
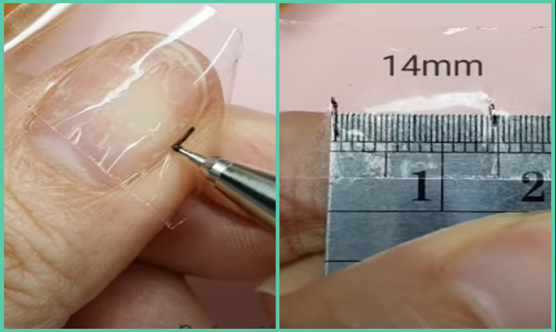
Carefully lift the tape off. You should see the outline of your nail’s width.
Use a pen to make small, clear dots or short lines right where the tape meets your skin on both sides.
Lay the tape flat on a ruler. Measure the distance between your two marks in millimeters (mm). That’s your nail width! (e.g., 14mm, 16mm). Compare this number to the brand’s size chart.
2. Paper & Pen Method (No Tape? No Problem!):
- Cut a small strip of paper (like from a sticky note).
- Hold it snugly against the bottom of your nail, pressing it up so it conforms to the curve at the widest point.
- Use a pen to mark where the paper touches your skin on the left and right sidewalls.
- Lay the paper flat and measure the distance between your marks with a ruler (mm). Again, compare to the chart. Super simple!
3. Soft Measuring Tape (For the Detail-Oriented):
- If you have a soft, flexible sewing tape measure, this is super precise.
- Gently wrap it around the widest part of your nail bed (not the nail tip itself), just like the tape/paper methods.
- Note the measurement where the tape meets zero. Record it in mm for each finger. Fingers vary! Your thumb will be bigger than your pinky.
4. Sizing Charts – Decoding the Letters (XS, S, M, L):
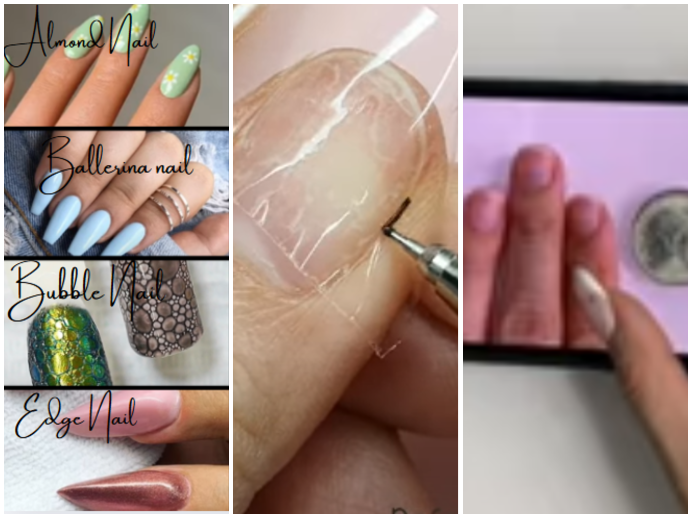
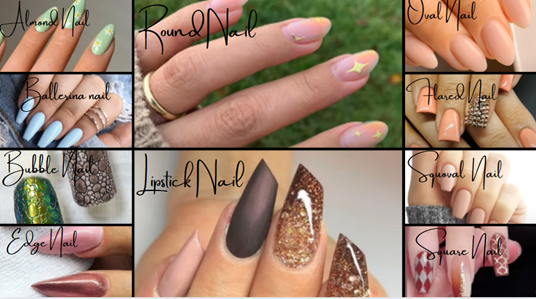
💡 Not sure what nail shape works best with your fingers? Before committing to a press-on set, check out this breakdown of popular fake nail types to find the one that suits your hand shape perfectly.
- Most kits come with letters instead of numbers. Don’t panic! Your measurements are key.
- Measure each nail using one of the methods above.
- Compare your measurements (in mm) to the brand’s specific chart. Crucial: Charts vary wildly between brands! Don’t assume a ‘Medium’ is universal.
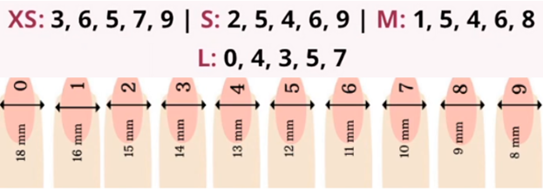
- Example Chart (Always check YOUR brand’s guide!):
- XS: Thumb (3), Index (6), Middle (5), Ring (7), Pinky (9)
- S: Thumb (2), Index (5), Middle (4), Ring (6), Pinky (9)
- M: Thumb (1), Index (5), Middle (4), Ring (6), Pinky (8)
- L: Thumb (0), Index (4), Middle (3), Ring (5), Pinky (7)
- Important: These numbers usually refer to the position of the tip in the kit’s packaging, not millimeters. Your mm measurement tells you which numbered/lettered tip to pick.
5. The Aussie Coin Hack (Clever & Quick):
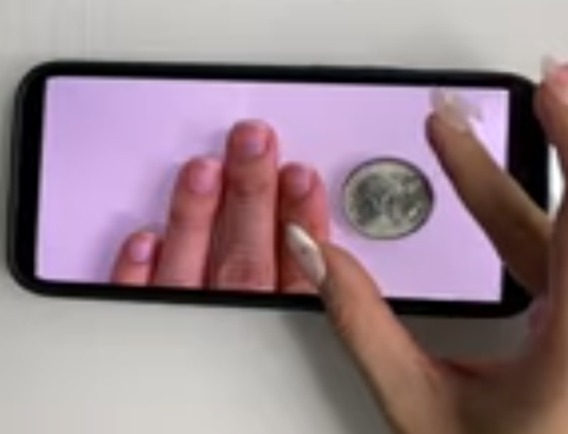
- Mainly useful if you’re in Australia and the brand references coins.
- Place a coin (like a 10c, 20c, etc.) flat on a table.
- Hold your fingertip next to it, aligning the widest part of your nail with the coin’s edge.
- Snap a quick photo straight above.
- Compare your photo to the brand’s coin reference chart to see which coin size matches each finger.
6. Invest in a Sizing Kit (Worth It for Regulars):
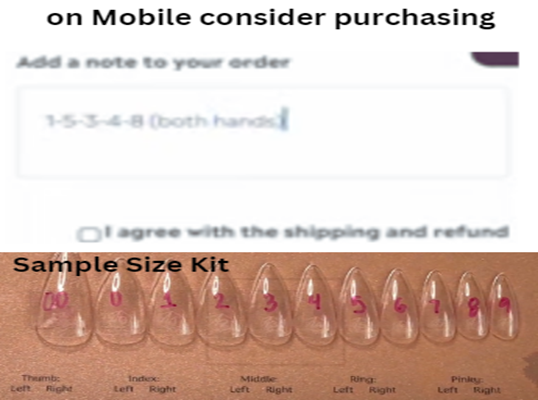
- If you wear press-ons often or plan to order custom sets, a sizing kit is a game-changer.
- These inexpensive kits contain one of each size (0-9 or XS-L).
- Simply pop the clear plastic tips onto your natural nails to find which number fits each finger perfectly. Note them down – you’ll use them forever! Takes the guesswork out completely.
7. Shape Matters! (Almond vs. Square vs. Coffin):
- The width measurement is key, but the shape can slightly affect how the tip sits, especially at the corners.
- When measuring, always focus on the widest point near the cuticle.
- If you have very curved nail beds or very flat ones (see tip below!), the fit might feel different across shapes even at the same width measurement. Filing the sides slightly after application often fine-tunes it.
8. Video Tutorials (See it to Believe It):
- Sometimes reading steps isn’t enough. Search YouTube for “How to measure for press on nails [Brand Name]”. Watching someone do it, especially applying a sizing kit, makes everything click instantly. Highly recommended if you’re a visual learner!
9. Double-Check & Compare Hands:
- This is HUGE: Your left and right hands often have different-sized nails! Your dominant hand’s nails might be slightly wider. Measure both hands.
- Thumbs are almost always the largest, pinkies the smallest, but your index and ring might surprise you. Don’t assume symmetry!
Pro Tips from My (Sometimes Messy) Experience:
- Pen Marks Lie! When using tape/paper, make tiny dots right at the skin edge. Big blobs add 1-3mm, leading to tips that swim on your nail. Measure carefully!
- Size Up, Not Down: If you’re between sizes, go slightly larger. It’s way easier to gently file the sides of a press-on for a perfect fit than to try and stretch one that’s painfully small. You can’t add material back!
- File for Perfection: Even a well-measured tip might need a tiny touch-up. A fine nail file is your best friend. Lightly buff the side edges after application if it feels snug anywhere. Go slow!
- Flat Nail Beds? Size Up! If your nails are naturally very flat (less curved), the press-on might not adhere well at the sides if it’s too narrow. Choosing one size up often gives a better seal and more comfortable fit.
- Pressed-on a size too small and now stuck with glue residue? Don’t worry – we’ve got you. Learn how to safely dissolve it with ease in this step-by-step nail glue removal tutorial.
- Brand Consistency (Mostly): The good news? Once you know your sizes (e.g., Thumb: Size 1, Index: Size 4, etc.), this usually translates well across most major press-on brands. Your sizing kit numbers become your golden ticket.
Getting the right fit makes all the difference between press-ons that look stunning and last days… and ones that drive you crazy. Take those few minutes to measure properly – your future flawless manicure is worth it! Now go rock those nails!
FAQs: Measuring Press-On Nails
Q1: What’s the easiest way to measure my nails?
A: Use the tape method:
- Place clear tape over the widest part of your nail.
- Mark both sides with tiny dots.
- Measure the distance between dots in mm.
(Takes < 2 minutes!)
Q2: My nails are between sizes—what now?
A: Always size up! Gently file the sides for a perfect fit. Downsizing causes lifting or discomfort.
Q3: Should I measure both hands?
A: Yes! Nail widths often differ per hand (e.g., dominant hand = slightly wider). Measure all 10 fingers.
Q4: Why do my press-ons lift at the sides?
A: Likely causes:
- Flat nail beds: Size up 1 size.
- Overgrown cuticles: Push them back before applying.
- Incorrect width: Re-measure the widest part near your cuticle.
Q5: Do sizing charts vary between brands?
A: Absolutely. A “Medium” in Brand A ≠ Brand B. Always:
- Measure your nails in mm.
- Match to that brand’s size chart.
Q6: Are sizing kits worth buying?
A: 100%—if you wear press-ons often. They’re affordable, reusable, and eliminate guesswork.
Q7: Can I reuse press-ons if I file them?
A: Yes, but minimally. Only file the side edges (not the length or top layer) to preserve durability.
Q8: How tight should press-ons feel?
A: Snug at the sides, never pinching. If it hurts, size up immediately.
Q9: Do almond/shaped nails fit differently than square?
A: Width is key, but shapes like almond/coffin may feel tighter at the tips. File corners if needed.
Q10: Why avoid pen marks on tape?
A: Thick marks add 1-3mm to your measurement → oversized nails. Use tiny dots instead!